< Back


Interactive UX Prototyping with OmniGraffle
I recently completed a project where I had to prototype with a high level of interaction on OmniGraffle. While going through this process, I learned a few tricks which I thought I could share.
Plan Your Project
This point may seem a bit obvious, but it is the most important. Before starting on your wireframes you should always sketch out a plan of what you want to create. It is faster and easier than if you were to plan it as you go. I usually sketch out my screens and annotate these drawings to plan what I want to be included on the screen, what each item on the page does, and what features on the application I can use to create them.

-
Figure 1. This type of sketching is just a process to get ideas on paper and work through a concept. They don’t have to be good as long as you can understand it.
Aside from planning out the wireframes, it is important to know what the wireframe will be used for when you are done. If you are making an interactive prototype in OmniGraffle, you will have different limitations than you would if you wanted to make it interactive in another application or if you just wanted screens for a slideshow. This article covers tips on how you would create a prototype if you wanted it to be interactive in OmniGraffle, either for testing or a walkthrough.
Organize the Document
From the start of the project, it is important to keep the document organized. Each canvas and layer should be appropriately named; you should be able to read the name and know exactly what the canvas/layer contains. This is very useful when you go in to add interactions or make changes. It also helps you manage your project as it grows.

-
Figure 2. All canvases and layers should be clearly labeled. These labels should describe in detail what the canvas/layer contains.

You should also order the canvases/layers as you go. For a canvas, this will allow you to easily find pages you are looking for. For layers, it will not only make it easier to find objects, but it determines how layers stack on top of one another. For example, if you have a layer for a pop-up, you need it to be the top layer, since it should appear on top of everything else.
Use Shared Layers
For any object that is the exact same (in size, shape, colour, location etc.) in more than one canvas, create a shared layer. With shared layers all changes you make or interactions you add will automatically update in all Canvases which contain that layer. This is useful for navigation bars since you won’t have to add the same interaction for each screen.

Figure 3. Shared layers are shown in orange. In a screen such as this, the top bar containing the home and profile dropdown should be in a shared layer with all canvases in the application; ensuring that all of them are updated when it is changed.
Using Layers
If you want to make the prototype interactive in OmniGraffle, layers are a great tool. It helps you keep the number of canvases to a minimum while increasing the interactions on each page. When I prototype, I create one canvas for each page of the application, while placing all of the objects on the page (and the different states of these objects) into different layers. I find that this is the best way to mock up a prototype if you want to include multiple interactions on one page. This method allows you to mock up multiple interactions which do not depend on each other in order to work. For example, if you want to create a page where you want users to sign up for an application, each field can be set up so that when clicked it fills in on that page instead of jumping to another page where that field has been filled out.
Layers can also allow you to change interactions for a certain button depending on whether a user has completed a particular task. To do this, you can put an invisible box on a layer which will be hidden until a specific action is performed, e.g. if a field in the sign in page is required, you can set it up so that continue gives you an error message if the field is empty, but when the layer containing the object in that field is shown, another invisible box will appear on the continue button with an interaction that takes them to the next page.
One thing to keep in mind when using layers is that when you export the document, the visible layers are merged; therefore, any interactions which show/hide layers will no longer work.
Interactions
I tend to use only two interactions, which together allow me to mock up most of what I would want in a prototype. These are: jumps elsewhere and show or hide layers.
Jumps elsewhere is used to move you from one canvas to another. As I previously described, I have each page of an application set up as a separate canvas. That means that Jumps elsewhere is used to move from one page to another.

- Figure 4. The menu on the right is what you are shown when you set an interaction for jump to. In this case you can select a canvas to jump to when the selected item is clicked.


-
Figure 5.The menu on the right is what you are shown when you set an interaction for show or hide layers. In this you can select an interaction for any layer of the canvas. The options are toggle, show, hide and none. For the checkbox in this image you would want to set it to toggle.


-
Figure 6. For more complex interactions, you can set some layers to hide and others to show. This works well to mock up radio buttons.

I also use jump elsewhere to make an object do nothing. This is a workaround to fill a gapin the functions. One issue I have with the preview mode of OmniGraffle is that when you click an object with no interaction, it shifts you to the next canvas (similar to PowerPoint). My way around this is to set an object without an interaction to jump to its own screen.
Show or hide layers is a bit more complicated. It will allow you to show, hide or toggle layers when an item is clicked. As I mentioned, I use layers to create all of the content on a page, and all of the different states of an object. You can use this to make up almost every interaction on a page.
For a checkbox you can select the box and set it to toggle a layer which contains the checkmark; this will allow you or a test participant to check and uncheck a box in preview mode.
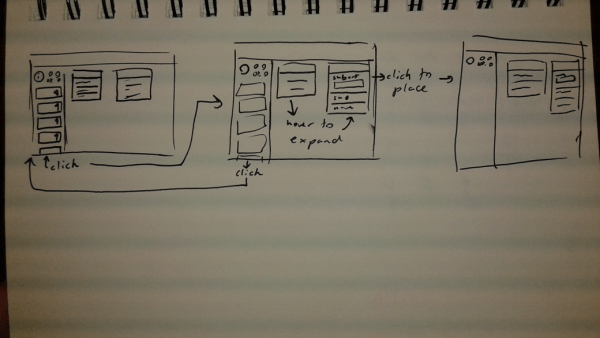
Now let’s say you have a menu item that you need to expand. You would set one layer as the contracted item, one as the expanded, then set it so that when the expand button is pressed, the contracted layer is hidden and the expanded layer is shown.
Conclusion
With these tricks, I was able to easily mock up my own prototype on OmiGraffle. Although it was a great tool, I did find that a few key interactions were missing, which I had to work around. These include drag and drop, hovering and scrolling through a page.
If you have any questions or tips of your own leave a comment below!

Share this article


Comments
Related Articles