< Back


How to Do a Paper Prototype Test in 7 Steps: The quick, easy, and dirt cheap way
Elsie had $100, very little time, and needed results. She and her team were developing a new grocery-shopping app that would substantially simplify everyday shopping for users. They’d vetted out their ideas and validated the need for their app. However, time was running short and they really needed to begin development. Elsie knew that if they just began building, they wouldn’t have enough money to build again if they made a mistake, but she didn’t have much money to pay for testing. What she needed was paper prototyping.
Paper prototyping, is not just something to be embraced by the fund deficient. Paper prototypes are an excellent place for someone who wants to start out incorporating usability testing to try. They don’t cost much, they don’t take too much time to do, and they’ll expose some of the flaws in your design. The cost of failure is very low.
Before you start telling yourself that you can’t possibly make a paper prototype of what your trying to design, let me throw out there that I have made successful paper prototypes for both an exercise video game and an app to remotely control your computer. You don’t need any real functionality to test these, so don’t waste all your time building code before determining what code you should be building.
7 Steps to Running your First Paper Prototype Test
Know what you’re making
Before you start drawing anything, you should have a good idea of what you’re trying to design and what it will be expected to do. If you don’t know that yet, then it’s time to stop and figure that out before moving forward.
Elsie already had a very good idea of what her team was building and had even done some prior testing to determine the need for this app.
Create your tasks
Don’t draw out every single frame in your system down to the flow of changing your password. You likely won’t have time to go through everything (unless you have a very small system). Write up a few of the most important tasks that users should be able to accomplish and test those first. Figure out the steps they will need to make in order to accomplish these tasks and only draw these steps out.
Elsie brainstormed with her team and came up with a short list of the most important tasks to test. These were: adding an online recipe, adding a printed recipe, manually adding to the checklist, and adding a staple food for the system to monitor.
Draw out your prototypes
Grab some paper and some pens. The goal is to be quick and cheap in drawing these, so your paper prototypes should not be a work of art. Consider drawing at least two possible ideas for the layout and structure of your content. Keep in mind though; if you’re having your users test both of your layouts, alternate which one is seen first. Either that or have half the participants use one version and the other half use the other one. The benefit of making at least two layout versions is so that you can quickly find your best layout and structure based on more than the creators’ personal preferences.
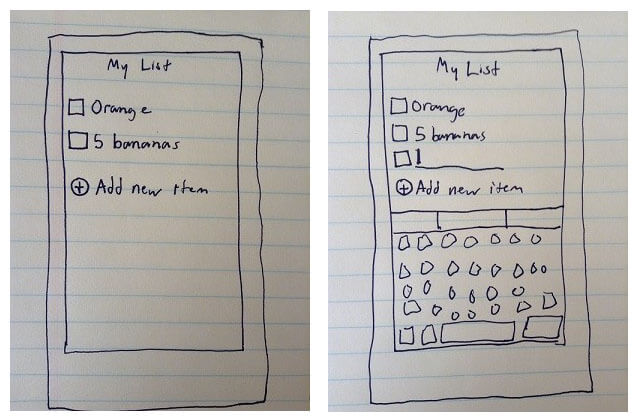
Below are two examples of paper prototype pages from Elsie’s app. These show two different potential layouts for the main screen of the app. As you can see, these are not that fancy and don’t take much time to produce. The amount of detail you need to include in these depends on the tasks that you set out in step 2 (Prototyping for Usability Testing -� How Detailed Should You Get?).

In addition to showing main screens, it is also important to show the different states each screen will be in as the users complete their tasks. So, for example once the user selects “Add new item†in the left picture below, you would show them a different drawn state of that page with the keyboard up ready for input.
Grab a handful of your users
At five or six users, you should already have some excellent feedback. Don’t feel the need to recruit a whole village. If you can’t get as many as five or six, then go with less, one user is far better than none. Let me emphasis that these people should be your users, not some of your friends, or worse, members of your development team.
Elsie had a good idea who her users were and where to find them, so she went to her nearest grocery store and asked customers who were mobile users if they would be interested in participating in a short study. After getting her first participant, Elsie was ready to begin testing.
Run your tests
Sit down with your users one at a time and ask them to complete each task. Tell them to talk aloud about their actions as they do them and act as if the paper drawings were a real device.
When the users tap on buttons take out the drawn prototype of where clicking that button should take them and respond to their actions as if you were the application. If the user clicks on an area that you didn’t expect them to click on and haven’t drawn out, don’t worry, just ask them what they would expect to find there.
Take notes while they complete their tasks and record if they were able to do the task and any problems they might have encountered. Better yet, get someone else on your team to take notes so that your attention doesn’t have to be divided between two activities.
Elsie ran all her tests and paid her users for their time. One of her team members wrote down notes about the sessions while Elsie changed the drawings in response to the users’ actions. After five users they were done and ready for analysis.
Look for trends
After completing the tasks with all your users, it’s time to make sense of your data. Make a list of all the issues that you noted down and look at how many times each issue appeared. Pay the most attention to issues that came up frequently or issues that prevented your users from being able to complete the tasks. These are the issues that you should focus on fixing first. Some issues might have very clear fixes (the icon you used was not understood) others might be manifestations of a problem elsewhere (text on a different screen gave the user a false idea of how the system works). Try to dig down to what you think caused each of these problems and come up with a possible solution.
Elsie compiled a list of all the problems and found that there were a couple of issues revolving around adding a staple food. Users didn’t understand why they would do this or what would happen if they did. Else realized that there probably wasn’t enough explanation provided around this functionality.
Act on them
Excellent! Now that you have your list of problems and possible fixes, it’s time to implement them. At this point, you could stop, but because you haven’t tested your new design, you can’t be sure that your changes have fixed the problems or if they have introduced new ones. The best thing to do is test your new design with the same tasks and start again from step three. It’s far more valuable to run several iterative tests with a few people than one big test with a lot of people. If you don’t have time or money for another test than you’ll just have to skip doing this, but try to plan for more testing phases next time. Once your design has done well enough in testing, it is time to start building.
To Elsie, this was more than worth it. Testing revealed that users did not understand a key part of their product and one of their main selling points. She was glad that she caught this problem before building the app, as this mistake would have been a lot more costly to fix later on. She also managed to fix a few minor problems ensuring that her company would have a stronger product on release.
Whether you’re a start-up or a fortune 500 company, paper prototype testing has a lot to offer you. Not only is it inexpensive and quick, but it also provides valuable insights about your current design. If you’re new to testing, this is a good place to start and even as testing becomes old to you this will remain an incredibly valuable activity.

Share this article


Comments
Related Articles


I think that the most important part of prototyping online is to know what you’re making! Having a vision and goal is very important. If you have a clear idea of the product a long with the goals you hope it to achieve, then you can be excited and passionate about your work.